March 09, 2021
On March 5, the climbing ECS learned about different pulley systems that many climbers use. Specifically, we learned how to make 1:1, 2:1, 3:1, 4:1, 5:1, and 6:1 pulley systems. Below is a photo showing what a 1:1, 2:1, 3:1, and 4:1 pulley system might look like (they can vary).
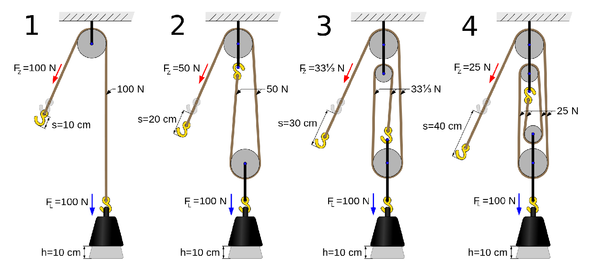
We also learned about what simple system and compound systems are. A simple system is a pulley system where the pulley travels with the load, while a compound system is a simple system that acts upon another system. We applied these terms to the many pulley systems we constructed. To end the day, we played a game of tug of war where seven students were against one student (aided by a 9:1 pulley system). Clearly, this wasn’t a fair fight because the seven students were acting against a ton of force. The seven students, unfortunately, lost the game.

On March 8, we learned about anchoring ourselves on walls for climbing. Certain varieties of climbing games permit various types of anchors, some that you must build yourself. There are two main types of anchoring tools that we used, nuts and cams. Nuts are (often) hexagonal bits of metal attached to a strong cord that can be fit into cracks of any size. They can be horizontally or vertically manipulated to find the best fit. The best fit of a nut should be even and high surface area contact, a tight fit in the crevice, and a low possibility of it moving or coming unlodged. Cams are similar but have a spring attached to the end to open and close the device. To use a cam, you pull its spring to shrink the device, then put it into the crack and let go of the spring to unfold it. Hopefully, the device should be about half-extended to best work safely. Otherwise, you run the risk of under-camming — having the device be almost fully extended and subsequently unsafe — or over-camming — having the device be under extended and likely stuck in the crack. Once you have been able to place these anchors, you must create a larger anchor from these nuts and/or cams. The best anchors consist of a total of three nuts and/or cams. From those three anchors, you can make multiple types of anchors, one of which is in the pattern of a “W.” To make this, you run your cord through all three carabiners and then press down on the loose cord that sits between each carabiner, pulling down the rope until it reaches the lower portion of the rope. This should create a W with even sides. From there, you can bunch together the cord into a bite (simply a piece of cordelette), then tie it in on itself or in a pattern of a figure-eight to create a safe point to attach your carabiner and yourself, too. This, if all done sufficiently well, creates a safe anchor from the wall. An acronym to better create these anchors is SERENE: Secure, Efficient, Redundant, Equalized, and No-Extension. Secure means it will not come undone from the wall. Efficient means it uses minimal equipment and time. Redundant means overly safe as to protect from potential failure; I.E., a missing or failed piece will not compromise the anchor. Equalized means all anchors and portions of the cord share an equal load. And No-Extension means that a failure in one anchor will not cause the load to shift dramatically, causing the climber to fall or the rope to be shocked.
On a similar topic regarding equipment and physically climbing, one of our co-instructors, Patrick, taught us how to safely and properly

lower ourselves from the rock we were climbing. Without someone on the ground to assist us, it can be tricky. However, today we learned that by attaching the belay loop to the rope extending to the floor, we could handle our descent’s speed along with the tension we allow on the rope. By using gravity to our advantage, we can lower ourselves using our lower half to essentially push ourselves down while simultaneously giving ourselves slack through the belay loop. There are several pros and cons to self-belaying. The pros being that you can control your own speed, it is easy to equalize the anchor in the direction of the load (aka you, the climber), mechanical advantage is in your favor, etc. The cons, however, would be that you rely solely on yourself for belaying; if you happen to fall, you end up putting more tension/force on the anchor (this is not a huge problem if the anchor is tightly secured), etc. Students today did not have any trouble when it came to learning the basic mechanics of self-belaying. In fact, a handful of students actually went back to do more! Overall the experience was thrilling, even those with a slight fear of heights.
While taking a break from anchors and self-belaying, our co-instructors, Dan and Arlo, taught us a quick lesson about the geology around the Garden of the Gods. Garden of the Gods is famously known for its red rocks, and we learned that those rocks are mostly limestone and sandstone. These famous rocks were formed millions of years ago during a geological upheaval. Below is a map that shows you where the variety of rocks are in the park and how long they date back too. This was a very interesting way to see how diverse the park’s rocks really are.